Configuring Windows 2000 Clients to Establish a Secure Connection Using Virtual Private Networking (VPN)
For other operating systems, browse the links below:
Windows 95
Windows 98
Content:
Setting Up Client VPN in Windows 2000
Making a VPN connection
VPN Troubleshooting
Additional Help:
Support
Setting Up Client VPN in Windows 2000
Before making a VPN connection to the SQL server, the client computer must first be configured for VPN. The steps below illustrate the configuration.
|
|
|

|
1
Click on Start -> Settings -> Control Panel.
|

|
2
Double-click on Network and Dial-Up connections.
|


|
3
Double-click on Make New Connection and click on Next. The wizard will start.
|
NO IMAGE
|
4
If this is the first time you have run Dialup Networking, you may be asked to enter your location and telephone area code. Enter these details (although they will not affect the VPN connection you are going to create) and click on Next or Finish as appropriate.
|
|
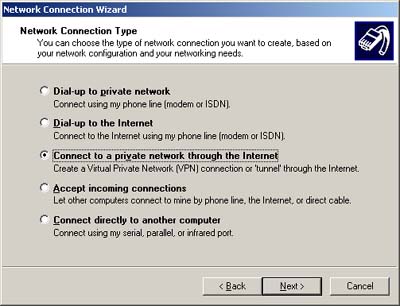
5
Select Connect to a private network through the Internet and click on Next.
|
|
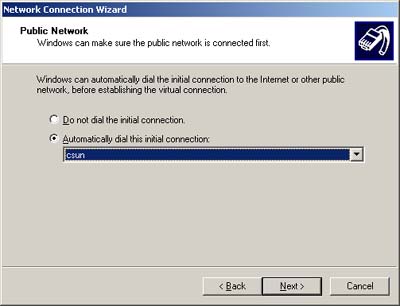
6
If you want Windows to automatically dial up your ISP whenever you open a VPN connection, tick Automatically dial this initial connection and select the ISP you want to call. If you are already connected to the internet, select Do not dial the initial connection. Click on Next.
|

|
7
Enter either the IP name (DNS) or IP address of the VPN server and click on Next. For DWG VPN server, the DNS is currently prosite.dns2go.com.
|

|
8
If you want this VPN connection to be available to all users, select For all users and click on Next. Otherwise, select Only for myself and click Next.
|

|
9
Type in a name for the connection and click on Finish.
|
NO IMAGE
|
10
You have just configued your computer for a VPN connection. You may be asked to reboot the computer. Now you are ready to make a VPN connection (see steps below).
|