Configuring Windows 98 Clients to Establish a Secure Connection Using Virtual Private Networking (VPN)
For other operating systems, browse the links below:
Windows 95
Windows 2000
Content:
Setting Up Client VPN in Windows 98
Making a VPN connection
VPN Troubleshooting
Additional Help:
Support
Setting Up Client VPN in Windows 98
Before making a VPN connection to the SQL server, the client computer must first be configured for VPN. The steps below illustrate the configuration.
|
|
|
|
1
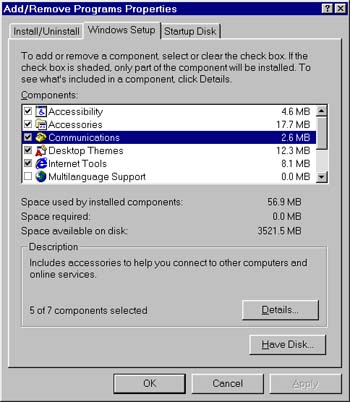
Check if the VPN component is installed on the client computer (you may need your windows 98 CD):
Start -> Settings -> Control Panel -> Add/Remove Programs then click on the Windows Setup tab, double-click on Communications.
|
|
2
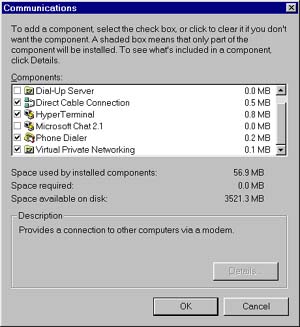
In the Communications dialog box, you see a list of components. Scroll down to locate the Virtual Private Networking component. If the latter is checked, then it is already installed and close all dialog boxes. Otherwise, check this option, click the OK button of the Communications dialog box, then the Apply button of the Add/Remove Programs Properties dialog box. You may be prompted to insert your windows 98 CD. After the installation, you may be asked to reboot your computer. Please do so to complete the installation.
|
NO IMAGE
|
3
If the VPN component is not available (which is generally the case for versions of windows 98 that are earlier than the second edition), you will need to download it from Microsoft. Just follow the instructions provided on the webpage. It can also be downloaded from our FTP site.
After the installation, you may need to go back to step 1 through 2. If the VPN component is now checked, just exit. Otherwise, check it and complete step 2. Reboot the computer if required.
|

|
4
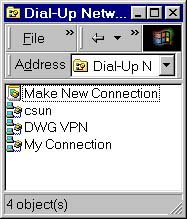
Double click on My Computer and double-click on Dial-Up Networking (DUN).
|
|
5
Double-click on Make New Connection
|
|
6
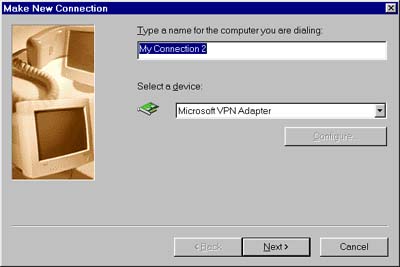
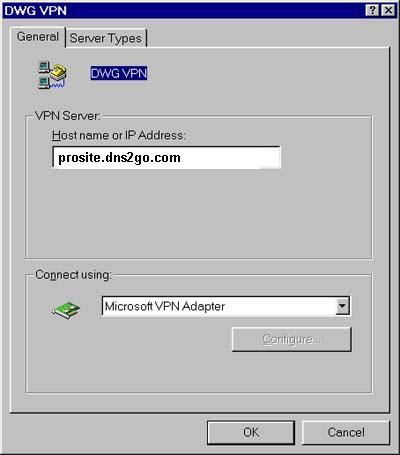
Enter a name for connection & select the device as Microsoft VPN Adapter and click on Next.
|

|
7
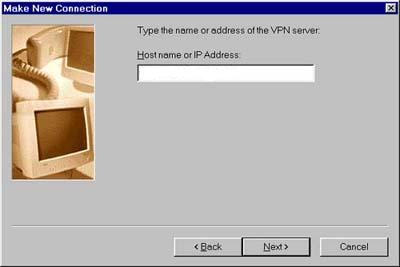
Enter either the IP name prosite.dns2go.com for DWG VPN server or IP address of the VPN server (if provided) as the host name and click on Next and then on Finish. IP addresses are in the following form: xxx.xxx.xxx.xxx where x is a digit from 0 to 9. For example 192.68.0.15 is a valid IP address.
|
|
8
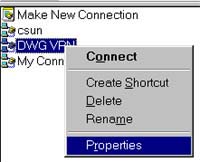
Right-click on the connection that you have just created and click on Properties.
|
|
9
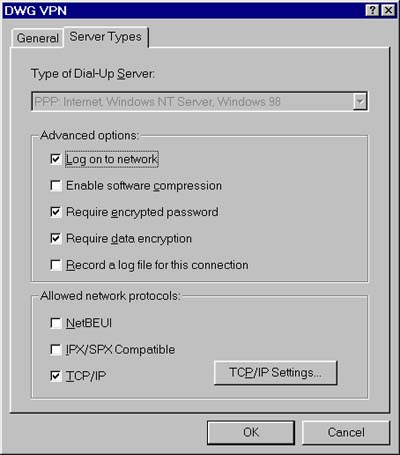
click on the Server Types tab and make sure that the following are selected: Log on to network, Require Data Encryption and TCP/IP. Make sure that NETBUI and IPX are not selected. Click on OK.
|